
- Title
-
Live Imaging Transverse Sections of Zebrafish Embryo Explants
- Authors
- Paulissen, E., Martin, B.L.
- Source
- Full text @ Bio Protoc
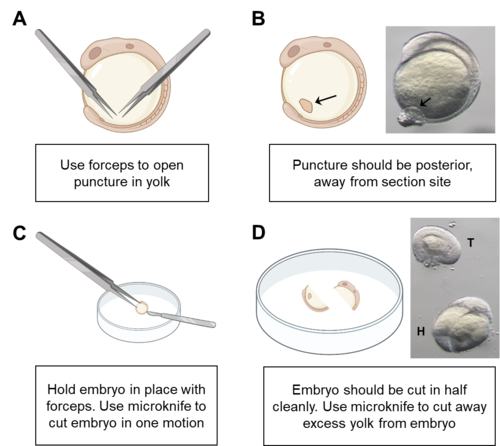
Schematic of embryo section. A. Opening a puncture in the yolk of the embryo allows venting of yolk after sectioning. This reduces the need to remove yolk manually, which can damage the endoderm. Use forceps to puncture yolk. B. Image of puncture in an 8-somite-stage embryo (black arrows). C. Schematic showing the position of forceps and microknife during sectioning. D. Image of sectioned explant. Tail of the explant (T) and head of explant (H) are visible. |

Schematic of embryo mounting in glass-bottom dish. A. Place a liquid drop of agarose/MBS on a glass-bottom dish. B. Immediately transfer the desired explant to the drop using a fire-polished pipette. C. Using forceps, gently orient the embryo until you adopt the proper position. A good marker of correct orientation is seeing a visible round notochord through the dissecting scope, as shown in the image (black arrow). D. Add MBS to cover the surface of the solidified agarose/MBS droplet. Using dip lenses may be necessary to image explant. |

Time-lapse imaging of cell polarization in the neural keel. A. Image of the neural keel starting at the 10-somite stage. B. Image of the neural keel after 60 min. Note the polarization of cells at the midline (red arrow). C. Image of neural keel after 120 min observation during the transition to the neural rod. Note the cells have polarized at the midline (red arrow ). Scale bars = 50 μm. |

|